We're currently on stage 5 restrictions, and moving to stage 6 in mid July - no outside watering from mains at all. The rainwater and irrigation system will save our lawn and veggies
WatchingStarredHistory
MembersPros
Browse Forums Eco Living 21 Mar 2016 51 NSW Loyal Member Re: Rainwater Harvesting Help 41Apr 03, 2020 9:30 pm It's slowed down a bit over the last few weeks but we've had some good falls for the last couple of days. We're currently on stage 5 restrictions, and moving to stage 6 in mid July - no outside watering from mains at all. The rainwater and irrigation system will save our lawn and veggies 21 Mar 2016 51 NSW Loyal Member Re: Rainwater Harvesting Help 42Apr 04, 2020 5:44 pm Got my first diy waterbouy installed today. I underdesigned the original part that keeps the filter from touching the bottom of the tank - you can see in my final pic that one of the legs snapped off unfortunately. Should be fine though. I've designed a much more robust one to go in the second tank (on the pump line) so just waiting on parts. Hopefully get the tanks in position tomorrow. Like ⋅ Add a comment ⋅ Pin to Ideaboard ⋅ Test to make sure the 150mm polystyrene ball provides enough buoyancy - it definitely does. It's attached with 20lbs braided fishing line. Like ⋅ Add a comment ⋅ Pin to Ideaboard ⋅ Like ⋅ Add a comment ⋅ Pin to Ideaboard ⋅ The above pics show how I got the hose into the tank. I fed the yellow tongue from the top of the tank through the brass through-tank fitting, then attached the end of some whipper snipper line and taped it around the brass fitting. I then pulled the whole thing up through the tank. I was then able to feed the yellow tongue through my hose, screw the take off valve onto the fitting and then drop the assembly back into the tank and slide it along the line so I could screw it back together. Like ⋅ Add a comment ⋅ Pin to Ideaboard ⋅ I've also attached a length of braided line that's tied off to the top of the tank so I can retrieve the assembly if I need to for whatever reason (ie. maybe replace the broken 'stand off'). You can see the broken leg in the top left corner Re: Rainwater Harvesting Help 43Apr 04, 2020 7:39 pm I have never understood why the commercial floating inlet hoses don't have a collar near the inlet to keep the meshed intake above the bottom of the floor when the water level is low but I have linked a photo (below) of one that does. Full marks for your first (prototype) 3D printed design but could you incorporate a boundary 'ring' on the follow up design to increase the meshed intake's 'resting' height as per the third photo in your last post? This would also strengthen the legs. Note how the saucer type one in the photo looks to have 'air escape' holes in it but a ring design would be better. The floating inlet usually needs to be about 200mm below the surface where the best quality water is but a tank supplied with filtered water through the Supadiverta low restriction inlet system also has better quality water near the surface in comparison to standard divert systems but a 150mm minimum is recommended to avoid the hose drawing a free surface vortex when connected to a pump. No such concerns with yours though because it is connected to the balance line between the tanks.Superb!  Re judging the float size, the float's buoyancy (air volume) = the weight of the same volume of water. 1 L of water = 1 kg. A polystyrene ball would have about the same buoyancy as a hollow ball. Like ⋅ Add a comment ⋅ Pin to Ideaboard ⋅ 3in1 Supadiverta. Rainwater Harvesting Best Practice using syphonic drainage. Cleaner Neater Smarter Cheaper Supa Gutter Pumper. A low cost syphonic eaves gutter overflow solution. 21 Mar 2016 51 NSW Loyal Member Re: Rainwater Harvesting Help 44Apr 04, 2020 7:51 pm 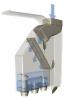 SaveH2O SaveH2OFull marks for your first (prototype) 3D printed design but could you incorporate a boundary 'ring' on the follow up design to increase the meshed intake's 'resting' height as per the third photo in your last post? This would also strengthen the legs. Thanks mate Like ⋅ Add a comment ⋅ Pin to Ideaboard ⋅ Re: Rainwater Harvesting Help 45Apr 04, 2020 7:56 pm That deserves an elephant stamp! (Going back to my grade 6 days now). 3in1 Supadiverta. Rainwater Harvesting Best Practice using syphonic drainage. Cleaner Neater Smarter Cheaper Supa Gutter Pumper. A low cost syphonic eaves gutter overflow solution. 21 Mar 2016 51 NSW Loyal Member Re: Rainwater Harvesting Help 47Apr 05, 2020 7:14 pm Did you have anyone to help you? 3in1 Supadiverta. Rainwater Harvesting Best Practice using syphonic drainage. Cleaner Neater Smarter Cheaper Supa Gutter Pumper. A low cost syphonic eaves gutter overflow solution. Re: Rainwater Harvesting Help 49Apr 09, 2020 6:41 pm Jomo, I will make some observations about your tanks. The first part will be of passing interest to you because tank overflows are not needed for your installation but the topic should be considered important to others who are considering tanks. The second part refers to your installation. PART ONE The past decade has seen a tendency by tank manufacturers to install overflow outlets very high on tanks, primarily to increase the tank's volume. This is opposed to tanks that traditionally have the overflow outlet fitted to the side of the tank which decreases the tank's capacity. Jomo's tanks have very high overflow outlets and are a good example of this trend but it must be kept in mind that overflow pipes are not needed for Jomo's rainwater harvesting system and the tanks are actually ideal for his application. NOTE: Internal 90 degree overflow bends are available to raise the water level. While a vertical pipe has greater drainage capacity than a horizontal pipe with the same depth of water above their crest/invert, it has to be remembered that the replacement 90 degree bend will drain with less depth of water above the crest than the horizontal outlet it replaces. This is not always disclosed by the seller or installer and the overflow's primary purpose should never be forgotten. EXAMPLE: A 100mm unmeshed horizontal outlet with 125mm of water above the invert will drain at about 340 lpm whereas a 100mm vertical pipe with 25mm of water above the crest will drain at about 160 lpm. https://rainharvesting.com.au/products/ ... h-flanged/ Like ⋅ Add a comment ⋅ Pin to Ideaboard ⋅ Note the overflow position (above) on Jomo's tanks.There are problems with this now common design but they can be overcome. 1. There is a significant lack of mitigation capacity during a major rain event. Additionally, a horizontal outlet's overflow capacity increases with an increased depth of water above the pipe's invert (the bottom of the pipe) and less mitigation means less available height above the pipe's invert. This results in less maximum flow capacity...a double whammy! 2. Tank manufacturers do not state the overflow outlet's discharge capacity and most would not know this at any rate. The same also applies to plumbers. Despite this, I constantly see wet systems diverting water to tanks from several downpipes that provide an inflow capacity that greatly exceeds the overflow pipe's discharge capacity during heavy rain. When a water tank's overflow connects to the stormwater system, the tank is part of the stormwater 'loop' and the pipes must be plumbed to compliance by using hydraulic calculations to design the system but this is rarely done...even by hydraulic engineers as per some of the Homeone threads I have answered over the years. 3. The overflow pipe draws a vortex which means that most of the overflow pipe's capacity is air. This is very inefficient and not always understood. Many sites giving 'expert' advice state that the overflow pipe must be the same size as a wet system inflow pipe (that flows full of water) but such advice is nonsense. See Victorian Building Authority diagram in the Technical Solution Sheet linked below for one such example that many other sites have copied. https://www.vba.vic.gov.au/__data/asset ... -Tanks.pdf 4. And the coup de grace is the outlet's mosquito proof overflow mesh which rarely has an open area greater than 55%. Even if a plumber was to know the formula for calculating a horizontal outlet's discharge capacity, he would be extremely unlikely to know how to factor the overflow mesh flow resistance into the calculations. Note that flow rates for unmeshed horizontal and vertical pipes of different sizes with different water levels above the pipe's invert are found in AS/NZS 3500.1 Figures 8.2 and 8.2 but also note that pvc pipes sizes are nominal. When considering a high inflow standard wet system, I highly recommend that the outlet mesh is removed and a meshed air gap is installed in the overflow pipe as removing the mesh from the entry to the overflow pipe will substantially increase the overflow's discharge capacity PLUS it also eliminates the possibility of the mesh gumming up, another cause of tanks overtopping. https://rainharvesting.com.au/products/ ... ap-family/ Like ⋅ Add a comment ⋅ Pin to Ideaboard ⋅ Like ⋅ Add a comment ⋅ Pin to Ideaboard ⋅ If the standard overflow mesh is retained, it needs to be regularly cleaned and this is done either externally by removing the pipe or internally by scrubbing the mesh. If done internally, the tank's top meshed inlet is removed and the mesh then accessed PROVIDED that the tank is optioned with the top meshed inlet within reach of the overflow outlet. Like ⋅ Add a comment ⋅ Pin to Ideaboard ⋅ If you look at the top of Jomo's tank (above), you will see that the overflow and the top meshed inlet are positioned diametrically opposed to each other. Unfortunately, many tanks are optioned like this but if the overflow pipe is fitted with a meshed air gap, it won't matter. PART TWO Jomo, having more than one Supadiverta allows the lid’s design to give you an additional advantage. If you seal off the top meshed inlets on both tanks and make them water proof, you could fit a meshed vent pipe to the lid's top centre position which would allow you to fit the Supadiverta that drains the larger roof area higher on the downpipe but with its internal reservoir wall lower than the top of the vent pipe. This will provide more hydraulic head to the system and when rain stops, the higher water level will back flow to the lower Supadiverta's internal reservoir and overflow to stormwater, thereby regulating the tank's water level. 3in1 Supadiverta. Rainwater Harvesting Best Practice using syphonic drainage. Cleaner Neater Smarter Cheaper Supa Gutter Pumper. A low cost syphonic eaves gutter overflow solution. 21 Mar 2016 51 NSW Loyal Member Re: Rainwater Harvesting Help 50Apr 10, 2020 2:30 pm Some very interesting points you raise there, it really does seem in the theme of the failed government insulation scheme where 'cowboy' installers with little experience or understanding/knowledge were able to make a quick, guaranteed, buck by going into business for themselves and calling themselves experts. Strange though that the manufacturers either don't know better or don't care when making their products, I guess if there is a dollar to be saved somewhere its likely someone somewhere will go for it. That sounds like a great plan to increase hydraulic head height and gain a little extra in storage ability. I'm thinking I can cut a rubber gasket, and put it between the tank and one of these - https://www.bunnings.com.au/rain-harvesting-300mm-tank-cover_p0103441 - and additionally put a 90mm end cap on the 'overflow' ports -- that should do the job. What would you recommend for the top vent? Just do a through tank fitting and screw a meshed filter onto it similar to my waterbouy filter? Or should I actively try and increase the height with a length of pipe additionally. I tried the hose method of finding level for setting the SD today, however it proved too difficult to get the air out of the length of hose. I'll drop into Bunnings tomorrow and grab the laser level you recommended - it says it'll project a laser point up to 20m so that should be sufficient, even if I may need to do it in the evening to see the actual dot. Other than that I should hopefully be able to have the tanks collecting water by the end of the long weekend. Re: Rainwater Harvesting Help 51Apr 10, 2020 10:41 pm That sounds like a great plan to increase hydraulic head height and gain a little extra in storage ability. It is a technique used mainly for large rural tanks plus they also divert the water off the SD filter via a wet system to a squat tank for outdoor use. I see your main advantage in having additional head mostly being when you have a small fast moving storm cell when the tank is nearly full. Increasing the head 300mm from 100mm to 400mm when the tank is 100mm below full level will double the flow rate. I have given some extra thought to it and I am now thinking that buying the covers and vents may not be worth the bother plus the cover would also need a small vent. An alternative would be to raise SD1 (maybe 100mm?) above the height of SD2 as this increase would not cause the tank to overtop. It is tricky trying to calculate the pipework's flow rate but a conservative guesstimated flow rate allowing for 35 metres of friction loss (worst case scenario) pans out at about 48 lpm with a 100mm head. With an additional 100mm head on SD1, you would be looking at 69 lpm and that final 100mm capacity would fill quickly as I (roughly) figure that each tank would hold about 260 litres per 100mm of height. x4 the head doubles the flow rate but the increase is not lineal. A 1 metre head will generate (worst case scenario) about 168 lpm and a 2 metre head +240 lpm. What would you recommend for the top vent? Just do a through tank fitting and screw a meshed filter onto it similar to my waterbouy filter? Or should I actively try and increase the height with a length of pipe additionally. Yeah, just a female tank fitting plus a pvc valve socket and a short pressure pipe with some mesh fitted over the top but it could be tricky doing up the tank fitting! Having an extra +300mm head would be very handy though. I like the silicone type of washer as seen on the Holman tank fitting linked below. Like ⋅ Add a comment ⋅ Pin to Ideaboard ⋅ Like ⋅ Add a comment ⋅ Pin to Ideaboard ⋅ 3in1 Supadiverta. Rainwater Harvesting Best Practice using syphonic drainage. Cleaner Neater Smarter Cheaper Supa Gutter Pumper. A low cost syphonic eaves gutter overflow solution. Re: Rainwater Harvesting Help 53Apr 11, 2020 12:05 pm When you finish the plumbing, I would leave the balance line shut until you first need to use the harvested water. The minimal 'sediment' in the settling tank will be suspended particles that did not settle as bed load. You won't have to syphon clean the tank for many, many years. You can install the SDs at any time prior to installing the pipe work. If it looks like raining, just wrap a few layers of cling wrap around the filter to divert all water to the stormwater. If you ever need to clean the gutters, do the same but put the filter back in top end first and horizontally under the inlet but leave the other end protruding 2-3 cm past the opening the lid normally covers. Also cover the exposed area below the filter. This will divert all muck from the gutter to the ground. The filter will fit snug because the SD body and filter are both tapered. It is also best to clean the gutters before installing. Have you worked out the flow rate the garden will need and picked out a suitable pump? 3in1 Supadiverta. Rainwater Harvesting Best Practice using syphonic drainage. Cleaner Neater Smarter Cheaper Supa Gutter Pumper. A low cost syphonic eaves gutter overflow solution. 21 Mar 2016 51 NSW Loyal Member Re: Rainwater Harvesting Help 54Apr 11, 2020 12:11 pm Nice will keep those thoughts in mind. Plumbing is pretty much ready to go as soon as the sd's are installed. Can't see the laser point from the level as it's too bright today which was expected, so I'll head out tonight and hopefully be able to see it. Then tomorrow clean the gutters and install it all 21 Mar 2016 51 NSW Loyal Member Re: Rainwater Harvesting Help 55Apr 12, 2020 7:04 pm Had good success after a few attempts - I was lucky enough that one of my downpipes is in a good position to project the laser light towards the tanks. Like ⋅ Add a comment ⋅ Pin to Ideaboard ⋅ Like ⋅ Add a comment ⋅ Pin to Ideaboard ⋅ Like ⋅ Add a comment ⋅ Pin to Ideaboard ⋅ Like ⋅ Add a comment ⋅ Pin to Ideaboard ⋅ 21 Mar 2016 51 NSW Loyal Member Re: Rainwater Harvesting Help 56Apr 13, 2020 5:24 pm Got the two SDs up on the downpipes today! Made a small cutting error on SD2 because I forgot that it didn't have all the size adapters that SD1 required - doh! Oh well a couple of folds of metal go it all connected up. Waiting for the silicon to dry and then I can attach the dropper pipes and plumb it all in (and finish painting) Like ⋅ Add a comment ⋅ Pin to Ideaboard ⋅ Like ⋅ Add a comment ⋅ Pin to Ideaboard ⋅ Like ⋅ Add a comment ⋅ Pin to Ideaboard ⋅ Re: Rainwater Harvesting Help 57Apr 14, 2020 8:18 am Slopes can be deceptive but the height will make cleaning the filter or just having a stickybeak a breeze. I can see you standing there in the rain looking at how it works but don't worry, most people do it. Did you consider leaving the original paperbark colour to be more neutral with the wall? 3in1 Supadiverta. Rainwater Harvesting Best Practice using syphonic drainage. Cleaner Neater Smarter Cheaper Supa Gutter Pumper. A low cost syphonic eaves gutter overflow solution. 21 Mar 2016 51 NSW Loyal Member Re: Rainwater Harvesting Help 58Apr 14, 2020 9:37 am Haha absolutely I will be! To be honest no I didn't - just thought "I'd better match the downpipe colour to the SD colour" so I painted it 'Manor Red' We do plan to grow vines up the garage wall at some point too, it's a bit of an ugly wall. 21 Mar 2016 51 NSW Loyal Member Re: Rainwater Harvesting Help 59Apr 20, 2020 12:37 pm What a busy couple of weekends I've had. I'm now happy to say that I'm officially at a point where if it rains I'll be catching it in my tanks! See below some pictures of final fitting solutions for the SDs to my tanks. Like ⋅ Add a comment ⋅ Pin to Ideaboard ⋅ Like ⋅ Add a comment ⋅ Pin to Ideaboard ⋅ Like ⋅ Add a comment ⋅ Pin to Ideaboard ⋅ Like ⋅ Add a comment ⋅ Pin to Ideaboard ⋅ Like ⋅ Add a comment ⋅ Pin to Ideaboard ⋅ Like ⋅ Add a comment ⋅ Pin to Ideaboard ⋅ In the final above pic you can see where the first flushes from the SDs come together into a tee, and then meet a solenoid valve. I'm extremely pleased to confirm that the solution works - it holds the full flush pipes, triggering the solenoid causes it to drain the pipes, and when the solenoid stops being triggered it happily goes back to a seal. The solenoid I'm using is - https://www.bunnings.com.au/pope-13mm-mini-barb-valve_p3130657 Final steps on the capture side are to drill a hole in the existing overflow pipe (where the main body of the down pipes goes), tap it, and put a 13mm barb fitting in there that I can connect with some hose to the outlet side of the solenoid. Wire the solenoid into my controller and setup an IFTTT (if this then that) programming to clear the flush pipes if we haven't had rain for a while. Finally I'll also get some sheet metal folded at some point to cover the drop pipes from the SD and make it all a little neater. I also received the Mk II design of my waterbouy-guard and installed that into tank 2 on the pump pickup line. Like ⋅ Add a comment ⋅ Pin to Ideaboard ⋅ Like ⋅ Add a comment ⋅ Pin to Ideaboard ⋅ I'm very happy with the MkII design - it seems a lot stronger and was very easy to install. I haven't mentioned the irrigation side of things in this post at all, but I've been planning away for the last few weeks designing that system also - I'll make a followup post on here showing my sprinkler design etc. Thank you so so much SaveH2O for all the assistance you've provided in this thread, private messages, and on the phone. Your expertise and support have been amazing and absolutely key in my project - I could not have done it without you. My neighbour who shares the fence that our tanks are sitting next to asked me yesterday: "so when are the pipes going in?" "what do you mean?" "the pipes from the tanks to your roof" They thought I was going to run 20m of horizontal pipework above the ground from the roof to my tanks. They must have thought my yard was going to be so ugly to look at for the last couple of months The SDs have allowed me a simple, clean and elegant install solution. I could not be happier with the results! I'll also post some follow-ups in regards to how the capture goes, can't wait til we get some rain!! There is a whole lot more to know than just the answers you seek but they are a good start. Overflow outlets have a mosquito proof mesh. These… 3 9092 Once you know the basics, the rest is easy. Read my post in the thread linked below. viewtopic.php?p=1919271#p1919271 2 20342 Grate, thank you! RexChan if thats the reason i could sleep well without thinking about additional cost. But 1st i'll need to read about NRV cleaning/replaing stuff. I… 7 31846 |