I love love love it! You've done a great job. Can't wait for more pictures and night shots.
What are the trees are around the grass please? Sorry if I've already asked this!
WatchingStarredHistory
MembersPros
Browse Forums Landscape & Garden Design Re: WREXTER'S REAR LANDSCAPING JOURNEY - Update Photos 122Nov 10, 2016 11:53 pm 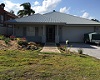 cat_dunc cat_duncI love love love it! You've done a great job. Can't wait for more pictures and night shots. What are the trees are around the grass please? Sorry if I've already asked this! Thanks cat, they are Oakville Crimson Spire, flowering plum. They grow tall and skinny with purple leaves. In early spring they cover in white flowers 13 Apr 2016 11 WA Junior Member Re: WREXTER'S REAR LANDSCAPING JOURNEY - Update Photos 124Nov 20, 2016 9:09 am Looks awesome wrexter! I just can imagine the satisfaction you must feel every time you look at it knowing you've done it yourself. And thanks for posting again. I thought you left us hanging for a moment there Your deck looks mighty fine. I am now definitely encouraged to rip off my unsightly pavers and replace it with jarrah decking. Few questions if you don't mind. - How much gap did you leave from the house boundary? is it absolutely necessary? - What coating did you use for your pine under deck structures? - How long would you need before you coat the deck? and what is the reason of delaying the application? - Do you need to sand it before oiling? and what decking oil are you going to use? - What type of decking screws are you using? As you can tell, I've never installed a deck in my life and considering the amount of investment (physically and financially), I would very much like to do it right the first time. Re: WREXTER'S REAR LANDSCAPING JOURNEY - Update Photos 125Nov 21, 2016 1:53 pm Thanks Kabaw, Yes there was a bit of hiatus with replys, had a few things on got lazy with posts ahah.. To answer your decking questions, don’t worry I had a 100 questions to that I had to find answers for. 1. I left a 5mm gap between deck boards, at first I though this would look to big but trust me over time this gap will reduce. My father in law installaled Jarrah Deck with 3mm gap between boards and now 3 years later in most areas there is NO gap! In terms of gap to the house boundary, they say 20mm but that is waaay to much, I went with 10mm, the perfect amount visually. 2. I coated the pine with good old Dulux Weathershield. I went for the cheapest colour I could find since its not seen (2 coats). 3. Generally, it is advised about 4 weeks. This is to let is ‘weather’ and let tannins come out otherwise the tannins will come up as black spots later. It helps to wash the deck regularly during this weathering period to help the tannins come out. 4. I just finished prepping my deck for coating by giving it a light sand and washing it with a oxalic solution (i.e. Napisan). After much deliberation I decided against oiling and I am using Floods Spa & Deck (Jarrah Stain). Lots of good user feedback and with 1.5yrs between coats. 5. I am using 65mm long stainless steel 304 decking screws bought from scrooz.com.au. Don’t let being a first timer scare you off, its straight forward once you get going. Are you in Perth? Re: WREXTER'S REAR LANDSCAPING JOURNEY - Update Photos 128Dec 16, 2016 6:06 pm That looks absolutely incredible wrexter...you should be super super proud of yourself! 28 Jan 2017 22 NSW Junior Member Re: WREXTER'S REAR LANDSCAPING JOURNEY - Update Photos 131Feb 27, 2017 2:52 pm wow... wrexter.. you're a one man builder with great architectural skills... I wish you're my neighbor btw.. quick one.. i decided to go on fully concrete slab extended from my alfresco ( i don't have side raised garden beds).. I don't see much of a people doing this. they usually go for decking like you did.. anything i should be worry about Re: WREXTER'S REAR LANDSCAPING JOURNEY - Update Photos 133Mar 30, 2017 10:49 pm Mate it looks sensational, hope my backyard turns out 1/2 as good as this! Customised Burbank Indigo/Hawthorn in Officer VIC https://forum.homeone.com.au/viewtopic.p ... 2#p1680752 16 Aug 2016 5 WA Junior Member Re: WREXTER'S REAR LANDSCAPING JOURNEY - Update Photos 134Aug 01, 2017 10:10 am Hey Wrexter, love this thread! Have read it countless times during the course of my build. I would love to do some rendered brick wall gardens like you did and was wondering if you could provide some dimensions for your wall or any finer details? I am thinking I will also go with the Gro Wall 4 as well. 16 Aug 2016 5 WA Junior Member Re: WREXTER'S REAR LANDSCAPING JOURNEY - Update Photos 135Aug 06, 2017 7:01 pm Has anyone else attempted anything similar? I am wondering how I would discretely do the retic to the gro wall in this set up, I obviously want to plan everything out first before getting started... Re: WREXTER'S REAR LANDSCAPING JOURNEY - Update Photos 136Oct 07, 2017 8:32 pm Hi wrexter. Hoping you might be able to explain a little more about your irrigation. 1. What's the loop and manual valve do before your solenoids. 2. Where's the x core controller located? Assume you also have some sensor attached? 3. How did you calculate the flow within each zone. I assume only one zone at a time? 4 would you mind sharing the parts list you got especially the hardware used from 20mm PVC to flex head you used on the pop-ups and other spray heads? 5 Lastly. The lighting is controlled via switches or pv sensor? Hi All, see above image. The required setback from the rear boundary in my case is 5m, as you can see the shape of the site and location of the boundary is slightly… 0 8566 Any advice on how to ensure the kit home granny flat that im thinking of buying will get council approval. The kit home companys wont release plans without a deposit and… 0 7395 |


