I’m not sure if I’ve got any ‘credits” left in seeking advice here, as I’ve already had a fair share in 2 previous threads, both of which were discontinued.
This time it’s a bit more for real, as I’m about to order a tank, given the lead time needed and the pipes are going in this weekend.
I’ve encountered an issue though that requires a bit of help.
As per the last 2 threads on the advice of saveH2O, a low resistance high velocity inlet will be used, nominally at 150mm high up on the tank.
To fit the tank size 22,500 litres 3.55m dia x 2.32m H the tank stand has had to be excavated 600mm below NGL.
The inlet usually suggested is 40mm, but all 3 firms quoting on this Aquaplate model cannot, for differing reasons, provide that size any longer.
I now have 2 options, 50mm (using an outlet connector) or 32mm.
From saveH2O’s description, both low resistance and higher velocity are involved, but I’m completely unsure of which option is best.
This latest iteration uses some of the recommendations from the last thread, and a variation or 2.
I hope that I’ve managed to learn from prior posts, but am ready for advice.
A new shed and garage are being built, with combined area of 85m2.
CFA requires 10,000 litres for bushfire needs, so it was decided to use a larger tank to provide the main supply to the house, with the benefit of new roofing. The existing roof sheets are over 40 years old with some deterioration evident. The existing tank will remain as a backup supply.
A review of BOM rainfall at a previously unknown site, but closer than others, showed average rainfall from the last 12 years averaged 1076mm pa.
ATA’s Tankulator was also used and shows the tank sizing, if filled 50% at the outset, maintained close to full over a 5 year projection, with “overflow” of around 15,000l litres, which will always flow to the older tank.
3 SupaDivertas will be used, 2 on the 9m shed and 1 on the 6m garage.
100x50 downpipes will fit directly into and out of the SupaDivertas, with an adaptor into the 90mm PVC piping, matching the existing system.
20mm PVC Class 12 from the SupaDivertas will feed 40mm Class 12 on the short 12m line to the tank.
45º bends and Pondflex will feed the inlet, once new sizing is determined.
The top of the tanks height has been set at the same level as the overflow level of the SupaDivertas.
A standard roof inlet has been kept, based on recommendations that air is required for healthy water. I’m not certain though whether sunlight is good or bad.
The overflow is to be fitted with a dust cap as it won’t be required.
Outlet is 25mm and 25mm Metric Poly line will feed the pump and house filter, both to be housed in the new garage, and inline valves to ‘switch’ between new and old supplies into the house.
one tank supplier queried if a back flow should be fitted to the low resistance inlet, but I haven’t seen that in any of saveH2O’s threads or images.
With the tank excavated and inlet at 150mm up, the differential between Supadiverta’s overflow level and the tank inlet will be 2170mm.
Trenching has been done, but is 300mm out from the walls, so instead of 2 x 90º bends with short pipe, I may use 15º 90mm and angle the Tees along the pipe.
Not as easy with the Class 12, so 2 x 90º + short extension may have to be used.
Not so sure what effect these 2 extra bends will have on the flow.
The ugly alternative is angling the pipes out from the Supadiverta the 300-350mm in the trench….
Like ⋅ Add a comment ⋅ Pin to Ideaboard ⋅
Like ⋅ Add a comment ⋅ Pin to Ideaboard ⋅
WatchingStarredHistory
MembersPros
Browse Forums Eco Living Re: Tank - 3rd try 4Apr 05, 2016 2:39 am Hi Tezzab. Sorry for the delay, it is difficult for me to get much computer time lately.  tezzab tezzab The inlet usually suggested is 40mm, but all 3 firms quoting on this Aquaplate model cannot, for differing reasons, provide that size any longer. I now have 2 options, 50mm (using an outlet connector) or 32mm. A new shed and garage are being built, with combined area of 85m2. A review of BOM rainfall at a previously unknown site, but closer than others, showed average rainfall from the last 12 years averaged 1076mm pa. 3 SupaDivertas will be used, 2 on the 9m shed and 1 on the 6m garage. Your 1:20 ARI is 140mm/hr, based on a 5 minute rain intensity duration of 2.33mm per minute. This is almost 200 lpm off 85 sq m of roof during a 1:20 ARI. You will need a 50mm inlet, a 32mm will be too small. tezzab 100x50 downpipes will fit directly into and out of the SupaDivertas, with an adaptor into the 90mm PVC piping, matching the existing system. 20mm PVC Class 12 from the SupaDivertas will feed 40mm Class 12 on the short 12m line to the tank. The 100 x 50 x 90mm adapter will need a 100 x 50mm PVCu sleeve to make a tight fit on the bottom outlet, we always use a 95 x 45 x 90mm adapter for a snug fit. If you have used the larger adapter, it won't matter much. A single 40mm pipe won't handle the flow (200 lpm) during a major storm, you will need to ensure that the Supadiverta overflow diverts away from the building. tezzab The top of the tanks height has been set at the same level as the overflow level of the SupaDivertas. A standard roof inlet has been kept, based on recommendations that air is required for healthy water. I’m not certain though whether sunlight is good or bad. The overflow is to be fitted with a dust cap as it won’t be required. You posted earlier that the tank will overflow to a second tank. If the tank has an overflow, you should mount the Supadiverta as high as possible to maximise head. Height adjusting it so that the top of the Supadiverta reservoir wall is a couple of cm below the bottom of the tank's overflow is only done when the tank will have no overflow, usually as a cost saving measure. The top of the reservoir wall is the same height as the website stamping on the Supadiverta's outside wall. Cut out some shade cloth and place it over the tank's top meshed inlet, this will stop sunlight but it won't restrict the ventilation. Not closing the overflow opening will allow better cross ventilation. tezzab one tank supplier queried if a back flow should be fitted to the low resistance inlet, but I haven’t seen that in any of saveH2O’s threads or images. I asume he means a backflow prevention device. This would have to be fitted to the PVC pipe. If you wanted to isolate the tank, you would simply close the tank's inlet valve, you would do this when you flush the sediment trap. The diagram shows the sediment trap fitted at the end of the pipe after the low restriction inlet. This is wrong, it needs to be fitted before the inlet in a non turbulent section of pipe. 3in1 Supadiverta. Rainwater Harvesting Best Practice using syphonic drainage. Cleaner Neater Smarter Cheaper Supa Gutter Pumper. A low cost syphonic eaves gutter overflow solution. Re: Tank - 3rd try 5Apr 05, 2016 7:36 pm  Lorri LorriIt sure sounds like hard work getting it sorted out, we have yet to enjoy doing ours , not started building , but will be in a about 4 months. Not much I can say to help, my eyes spun just reading your posts lol. Good luck! thanks Lorri, There are so many things to consider for what appears a basic system. Thanks to the ever helpful expertise of primarily saveH2O it's worth the extra in pursuing an improved system for both the supply and quality of drinking water than is normally provided. Re: Tank - 3rd try 6Apr 05, 2016 7:57 pm 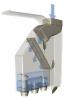 SaveH2O SaveH2OHi Tezzab. Sorry for the delay, it is difficult for me to get much computer time lately. I am very grateful that you've been able to examine this proposed system, and for your suggestions and comments. This is and will be the 3rd time lucky. Quote: Your 1:20 ARI is 140mm/hr, based on a 5 minute rain intensity duration of 2.33mm per minute. This is almost 200 lpm off 85 sq m of roof during a 1:20 ARI. You will need a 50mm inlet, a 32mm will be too small. 50mm it shall be. Quote: The 100 x 50 x 90mm adapter will need a 100 x 50mm PVCu sleeve to make a tight fit on the bottom outlet, we always use a 95 x 45 x 90mm adapter for a snug fit. If you have used the larger adapter, it won't matter much. The 95x45x90 adapter seems to be a rare bird, and hasn't been obvious in googling. I would prefer this as the sleeves I've seen are "inflated" price wise, so any pointers to a source would be appreciated. Quote: A single 40mm pipe won't handle the flow (200 lpm) during a major storm, you will need to ensure that the Supadiverta overflow diverts away from the building. The 40mm is what I had from previous plans, along with fittings, but if 50mm or larger PVC PN12 is required I may chase that up. BTW, the tank inlet will be at 320mm, and the pipe is horizontal all the way to the tank. Quote: You posted earlier that the tank will overflow to a second tank. If the tank has an overflow, you should mount the Supadiverta as high as possible to maximise head. Height adjusting it so that the top of the Supadiverta reservoir wall is a couple of cm below the bottom of the tank's overflow is only done when the tank will have no overflow, usually as a cost saving measure. The tank's overflow will have a dust cap fitted, and there'll be no direct overflow from the tank to the "old tanks" The 3 x Supadivertas will overflow into new 90mm pipes that join the existing pipes down to the old tank.. Quote: The top of the reservoir wall is the same height as the website stamping on the Supadiverta's outside wall. I've allowed for the Supadivertas "website stamping" level to match the published height of the tank, but they are not yet installed. If the Dust Cap cannot be sealed so the tank holds more water, then the Supadivertas will be placed lower down to match. Quote: Cut out some shade cloth and place it over the tank's top meshed inlet, this will stop sunlight but it won't restrict the ventilation. Not closing the overflow opening will allow better cross ventilation. Great, thanks for clarifying. Air but not sun.. couldn't quite remember. Quote: I asume he means a backflow prevention device. This would have to be fitted to the PVC pipe. If you wanted to isolate the tank, you would simply close the tank's inlet valve, you would do this when you flush the sediment trap. OK, correct terminology, now I understand. Quote: The diagram shows the sediment trap fitted at the end of the pipe after the low restriction inlet. This is wrong, it needs to be fitted before the inlet in a non turbulent section of pipe. Will do, and easy enough as there's several metres of straight pipe in which to do so. Again, very indebted to you for the continuing assistance and apologies for being a slow learner. Re: Tank - 3rd try 7Apr 06, 2016 2:11 am tezzab The Supadivertas othe two outlets both have 19mm Class 12 pressure pipe, connected to 40mm Class 12, again with 45deg elbows. At the tank end is a 40mm ball valve. There are 90deg bends at approx 1200mm and 5000mm. The following 8 metres to the tank site is a straight line. It will be 20mm PVCu Class 12 pressure pipe, the actual internal diameter is 23.7mm. The 40 mm PVCu pressure pipe internal diameter is about 45mm. So...they did fit a 40mm valve after all. Just looking at the diagram, it looks like the middle Supadiverta (in the corner) will be harvesting most of the larger roof area but it shouldn't be an issue. Just wondering why you didn't use a 45 degree elbow instead of the 90 degree elbow just prior to the tank? That would have reduced friction loss a little and allowed a straight run to the tank's 40mm inlet valve. tezzab As the lower 10,000 litres is for CFA use, I might specify that the low restriction inlet be at this level, just to simplify connections which includes the Pondflex, unless there are reasons why lower down is preferred. The inlet's height will make no difference to the in-flow rate because the head is determined by the height of the water level in the tank. I would have the low restriction inlet about 80-100mm above the bottom of the tank at the valves lowest point. 40mm Pond flex is somewhat expensive but it is also is a lot stiffer than the 32mm and 25mm sizes and for practicality, having the valve lower is much better. Just be aware that when you specify the valves height, the tank company will usually refer to the valves height as being central and not the lowest part of the valve. A (lowest point) height of 80-150mm is no problem. tezzab I confess to that the multitude of factors, equations, concepts and calculations have been above my head or too complex for me to comprehend in amongst far too many other elements in my overall refurb project. That's why I've sought advice, but as I need to place an order very soon, I'd welcome comments. The Supadiverta system is quite simple but people do have some trouble deciding on their pipe sizes and understanding head and flow. This will be addressed with a coming website revamp and some example diagrams...it is just a matter of finding the time to make it happen. For your system and rainfall pattern, it allows you to harvest a good roof area and provide good quality water to the tank without even needing to fit an overflow pipe to the tank. tezzabI've managed one quote from a plumber. When explaining showing him the diagram of the Sediment Trap, he's specified his own method of using a Slide Valve. I have no comparison as to whether this as effective as the tried and tested saveH2O method, or whether I can specify and convince him it's better. As explained in the previous post, the sediment trap is in the wrong position, the plumber would have thought that it was useless...which it is in the position as shown in the diagram. The slide valve is a standard drain facility. The beauty of the sediment trap is that it can be regularly flushed when convenient and little water is lost whereas the flush interval of a regular flush system is greater and the yield loss is much higher. tezzab The tank pad was in theory very slightly sloped so that rainfall would runoff to the pit on the right. The opposite is the reality once rain fell. Water remained in the rear half of the photo. I've only been able to come up with one idea to remedy this situation. That is to cut lines into the concrete allowing the water to drain towards the pit, a suggestion I put to the concretes whilst it was being poured I'm not at all sure though if that may have any ramifications for the base of the tank. It sounds like you need a sloping lip on the bottom side of the base. 3in1 Supadiverta. Rainwater Harvesting Best Practice using syphonic drainage. Cleaner Neater Smarter Cheaper Supa Gutter Pumper. A low cost syphonic eaves gutter overflow solution. Re: Tank - 3rd try 8Apr 06, 2016 2:53 am tezzab The 95x45x90 adapter seems to be a rare bird, and hasn't been obvious in googling. I would prefer this as the sleeves I've seen are "inflated" price wise, so any pointers to a source would be appreciated. The 100 x 50mm sleeves are made by cutting short lengths of 100 x 50mm PVCu downpipe and the price is exorbitant. Bunnings sell the 95 x 45 x 90mm adapters but you have to look where the downpipes are, not where all of the other adapters are. If your local Bunnings don't have them, just order some at the special orders desk. Because they are supplied to other Bunnings stores, they will get them in. If you are going to Farm World at Lardner Park next week, I will also be going on one of the 4 days and I could bring some along. They are a snug fit to the Supadiverta's bottom downpipe connection. tezzabThe 40mm is what I had from previous plans, along with fittings, but if 50mm or larger PVC PN12 is required I may chase that up. The 3 x Supadivertas will overflow into new 90mm pipes that join the existing pipes down to the old tank.. You have to use 20mm class 12 PVCu pipe because the lower pressure class 9 is not made in 20mm but for the larger sizes, you should use class 9 pipe if you can get it because it is cheaper plus it has a larger internal diameter than class 12. Given that you are (cleverly) diverting the Supadiverta overflow to the second tank, the 40mm common pipe supplying the first tank is ideal. Put some shade cloth over the second tank's top inlet mesh to make cleaning easier. tezzabIf the Dust Cap cannot be sealed so the tank holds more water, then the Supadivertas will be placed lower down to match. Line it up a couple of cm below the outlet. Bunnings sell caps that seal 90mm overflows, look where the stormwater fittings are. You only need a dab of sealant, it will be under no pressure and it is best that you can remove it if you ever need to. NOTE: If you are having the 100mm first flush kits fitted to more than one Supadiverta, you can use a common 19mm polypipe to drain all 3 First Flush Pipes to a single inline tap. 3in1 Supadiverta. Rainwater Harvesting Best Practice using syphonic drainage. Cleaner Neater Smarter Cheaper Supa Gutter Pumper. A low cost syphonic eaves gutter overflow solution. Re: Tank - 3rd try 9Apr 07, 2016 12:24 am Quote: So...they did fit a 40mm valve after all. The Inlet will be 50mm, but the horizontal pipe I have on hand is 40mm. If larger feed pipe is better, I will buy some, as well as fittings from the 20mm vertical pipe from the Supadivertas. These currently are 45degree Tees, with the Tee on the pipe angled to meet the adapter so as not to use 2 adapters. Same strategy is employed for the 90mm stormwater pipes. Quote: Just looking at the diagram, it looks like the middle Supadiverta (in the corner) will be harvesting most of the larger roof area but it shouldn't be an issue.  Quote: Just wondering why you didn't use a 45 degree elbow instead of the 90 degree elbow just prior to the tank? That would have reduced friction loss a little and allowed a straight run to the tank's 40mm inlet valve. That's my poor diagramming skills.  There's actually no 45or90 bend planned at all, (unless otherwise advised), but a metre There's actually no 45or90 bend planned at all, (unless otherwise advised), but a metre long sweeping curve using the Pondflex. Quote: I would have the low restriction inlet about 80-100mm above the bottom of the tank at the valves lowest point. 40mm Pond flex is somewhat expensive but it is also is a lot stiffer than the 32mm and 25mm sizes and for practicality, having the valve lower is much better. Just be aware that when you specify the valves height, the tank company will usually refer to the valves height as being central and not the lowest part of the valve. A (lowest point) height of 80-150mm is no problem. I was under time pressure to arrange the tank order, so it has been ordered a little higher unfortunately. Quote: The Supadiverta system is quite simple but people do have some trouble deciding on their pipe sizes and understanding head and flow. This will be addressed with a coming website revamp and some example diagrams...it is just a matter of finding the time to make it happen. For your system and rainfall pattern, it allows you to harvest a good roof area and provide good quality water to the tank without even needing to fit an overflow pipe to the tank. The main principles of the Supadiverta are easily understood, even for me. I think the main issue is the vast range and flexibility that comes after is where things can become muddled. Because there are just so many alternatives, and getting knowledge of what fits and what doesn't fit between the various standards, and without the opportunity to physically try and trial in shops that don't stock all varieties makes it a bit of a maze. tezzabQuote: As explained in the previous post, the sediment trap is in the wrong position, the plumber would have thought that it was useless...which it is in the position as shown in the diagram. The slide valve is a standard drain facility. The beauty of the sediment trap is that it can be regularly flushed when convenient and little water is lost whereas the flush interval of a regular flush system is greater and the yield loss is much higher. I did realise the incorrect sediment trap location, which will be rectified. The prices I've seen for 90mm slide valves also makes using your system even more worthwhile, so I'll push for the plumber to adopt your method. Quote: tezzab The tank pad was in theory very slightly sloped so that rainfall would runoff to the pit on the right. The opposite is the reality once rain fell. Water remained in the rear half of the photo. I've only been able to come up with one idea to remedy this situation. That is to cut lines into the concrete allowing the water to drain towards the pit, a suggestion I put to the concretes whilst it was being poured I'm not at all sure though if that may have any ramifications for the base of the tank. It sounds like you need a sloping lip on the bottom side of the base. I've spoken with one of the concreters who will come and cut channels into the pad, a lot less complex than a sloping lip on a circular base. If I need to use bigger diameter inlet pipe, I'll also get a matching diameter of PondFlex. If I find a method to ensure the "Dust Cap" on the tank's overflow port is fully sealed, I'll adjust the Supadiverta to match the extra height/level of water in the tank. Re: Tank - 3rd try 10Apr 07, 2016 3:08 pm tezzabThe Inlet will be 50mm, but the horizontal pipe I have on hand is 40mm. If larger feed pipe is better, I will buy some, as well as fittings from the 20mm vertical pipe from the Supadivertas. These currently are 45degree Tees, with the Tee on the pipe angled to meet the adapter so as not to use 2 adapters. Same strategy is employed for the 90mm stormwater pipes. Because the Supadivertas will divert excess water to the second tank through the 90mm stormwater pipe during heavy rainfall or when the first tank fills, you can leave the current 40mm pressure pipes as is. Because you have to use a 50mm valve, you will also need to use 50mm ClearPond PondFlex hose which is very rigid and expensive as are other 50mm fittings. Many irrigation and pond shops stock rolls of the smaller size PondFlex and they have rolls that they will cut a short length off. I don't know how you would go trying to get a short length of 50mm PondFlex. To keep it simple, you can fit a poly 50mm x 40mm reducing nipple to the 50mm valve and have 40mm all the way. Just check as to the male/female thread/size requirement. You will also need a poly elbow to make fitting the PondFlex hose easier as this will allow you to divert the hose upwards at a preferred 45 degree angle. tezzab There's actually no 45or90 bend planned at all, (unless otherwise advised), but a metre long sweeping curve using the Pondflex. That's good but are you sure that 1 metre will be long enough? tezzabThe main principles of the Supadiverta are easily understood, even for me. I think the main issue is the vast range and flexibility that comes after is where things can become muddled. Because there are just so many alternatives, and getting knowledge of what fits and what doesn't fit between the various standards, and without the opportunity to physically try and trial in shops that don't stock all varieties makes it a bit of a maze. It is very versatile and the planned diagrams should make the planning a lot easier. I hope to be able to get around to the updates soon. tezzab The prices I've seen for 90mm slide valves also makes using your system even more worthwhile, so I'll push for the plumber to adopt your method. The 90mm slide valves are generally around the $70 mark. You have two pipe lines, the 40mm pressure pipe and the 90mm stormwater pipe. 40mm pressure pipe. The water passes through the S/D 750 micron filter and so it is ok to reduce the pipe size at the sediment trap. We use 40mm wye junctions but they are hard to find and I am also out of them but you can use a 40mm plain tee and a 90 degree elbow. A reducing coupling can then reduce the 40mm pipe exiting the elbow to 25mm or 20mm if you decide to use smaller 19mm or 25mm poly pipe. You use a 20mm or 25mm faucet socket to connect a 19mm or 25mm poly director to the pressure pipe. An inline tap is then fitted at the end of the poly pipe. A problem you will have is the 90mm stormwater pipe as it isn't as versatile as DWV pipe and you will notice that the sediment trap diagrams all show 100mm DWV. The water will also NOT have passed through a filter and so reducing the pipe size does carry some risk. You should talk to the plumber about the best way to address this, he may suggest having a 90mm stormwater tee at the base of the vertical riser and the additional orifice can then be adapted to 100mm DWV and reduced with a pipe reducer to 50mm or 40mm. There are several options that the plumber will know. 3in1 Supadiverta. Rainwater Harvesting Best Practice using syphonic drainage. Cleaner Neater Smarter Cheaper Supa Gutter Pumper. A low cost syphonic eaves gutter overflow solution. Re: Tank - 3rd try 11Apr 09, 2016 1:38 pm Quote: The Inlet will be 50mm, but the horizontal pipe I have on hand is 40mm. If larger feed pipe is better, I will buy some, as well as fittings from the 20mm vertical pipe from the Supadivertas. These currently are 45degree Tees, with the Tee on the pipe angled to meet the adapter so as not to use 2 adapters. Same strategy is employed for the 90mm stormwater pipes. Quote: Because the Supadivertas will divert excess water to the second tank through the 90mm stormwater pipe during heavy rainfall or when the first tank fills, you can leave the current 40mm pressure pipes as is. Because you have to use a 50mm valve, you will also need to use 50mm ClearPond PondFlex hose which is very rigid and expensive as are other 50mm fittings. Many irrigation and pond shops stock rolls of the smaller size PondFlex and they have rolls that they will cut a short length off. I don't know how you would go trying to get a short length of 50mm PondFlex. To keep it simple, you can fit a poly 50mm x 40mm reducing nipple to the 50mm valve and have 40mm all the way. Just check as to the male/female thread/size requirement. You will also need a poly elbow to make fitting the PondFlex hose easier as this will allow you to divert the hose upwards at a preferred 45 degree angle. The 50>40 using Poly Directors and reducing nipple looks the simplest method, and I have 2 x Poly Directors on hand already. I'll need to lower the 40mm line in order to create the 45º angle to the inlet. There's actually no 45or90 bend planned at all, (unless otherwise advised), but a metre long sweeping curve using the Pondflex. [/quote] That's good but are you sure that 1 metre will be long enough? [/quote] I'm hoping it will be, otherwise another 90km round trip to the closest Pondflex retailer. No problems with 40mm, and I think they had by the metre 50mm, but price was "up there". Quote: The main principles of the Supadiverta are easily understood, even for me. I think the main issue is the vast range and flexibility that comes after is where things can become muddled. Because there are just so many alternatives, and getting knowledge of what fits and what doesn't fit between the various standards, and without the opportunity to physically try and trial in shops that don't stock all varieties makes it a bit of a maze. It is very versatile and the planned diagrams should make the planning a lot easier. I hope to be able to get around to the updates soon. The new planning diagrams will most certainly improve planning for others. I don't know how others have found sourcing the various types of pipes and fittings, but I've found that one source may have only 1/2 of what's needed, and less common items require chasing down via other stores. So if it's at all possible, a rationalisation or consolidation of fittings would reduce the chasing around for parts. Quote: The prices I've seen for 90mm slide valves also makes using your system even more worthwhile, so I'll push for the plumber to adopt your method. The 90mm slide valves are generally around the $70 mark. You have two pipe lines, the 40mm pressure pipe and the 90mm stormwater pipe. 40mm pressure pipe. The water passes through the S/D 750 micron filter and so it is ok to reduce the pipe size at the sediment trap. We use 40mm wye junctions but they are hard to find and I am also out of them but you can use a 40mm plain tee and a 90 degree elbow. A reducing coupling can then reduce the 40mm pipe exiting the elbow to 25mm or 20mm if you decide to use smaller 19mm or 25mm poly pipe. You use a 20mm or 25mm faucet socket to connect a 19mm or 25mm poly director to the pressure pipe. An inline tap is then fitted at the end of the poly pipe. That's basically the current plan I'm working to, but might try to find 40>20 PVC just keep similar product types. [quote]A problem you will have is the 90mm stormwater pipe as it isn't as versatile as DWV pipe and you will notice that the sediment trap diagrams all show 100mm DWV. The water will also NOT have passed through a filter and so reducing the pipe size does carry some risk. You should talk to the plumber about the best way to address this, he may suggest having a 90mm stormwater tee at the base of the vertical riser and the additional orifice can then be adapted to 100mm DWV and reduced with a pipe reducer to 50mm or 40mm. There are several options that the plumber will know With a better understanding now of the Sediment traps, I may have a solution. 2 x PVC 90mm runs exit the ground and run unsupported over 4 metres to the old FG tank, then up vertical risers. I had added a T to each, the upward part as charged systems to the tank inlet. the downwards part is a crude sediment trap, using multireducers to get down to 40mm, and ball valves at the bottom. I made a blunder in fitting 2 x vertical risers with Inline and removable Mosquito Filters. In this location they clogup, and eventually become impossible to remove. There is enough room now to "hang" sediment traps under the existing 2 pipes. With a 90-40 stepped reducer (DWV) sorting this should be relatively straighforward Re: Tank - 3rd try 12Apr 25, 2016 9:52 pm Tank arrived on the scheduled day, with 3 strong men to lift off the truck and get it into position. Very glad of that, as a local supplier would only have only sent a driver. Like ⋅ Add a comment ⋅ Pin to Ideaboard ⋅ the 40mm will be dug in at the end of the path. To the left of the central inlet is the CFA outlet and fittings. The "standard" top meshed inlet is immediately above the 50mm central inlet but there'll be no riser, just the 40mm uPVC feed. Quote: We use 40mm wye junctions but they are hard to find The sediment trap will be using the 40mm wye as the online shop you mentioned in WA did have some and were able to sell without me being "in the trade". Might be a new policy, didn't ask. trying to control costs, I've kept the smaller Pondflex. Quote: That's good but are you sure that 1 metre will be long enough? With the tank in place, I've set up a dummy run on the inlet. From right to left, 40mm 45º angle, at ground level from the main 40mm pipe. a little masking tape in place of short inner 40mm pipe, to a threaded adaptor ( faucet??), into a Poly Director and the Pondflex. Another Poly Director, then a slightly different adaptor, and another 45º elbow, which is is angled for height as well as turn. yet another threaded adaptor and a 40mm to 50º adaptor into the inlet valve. I hope this will be sufficient in rising the 300mm or so. the 40mm poly underneath will be the centre outlet of the 3 Supadivertas, feeding the pit, which also has 2 aggie drains and the channel drain from the path. Once settled, the poly may be replaced by the proper Supadiverta flush devices but for the moment these are on hold due to the multiple step construction required, and the myriad of other works concurrently underway. Like ⋅ Add a comment ⋅ Pin to Ideaboard ⋅ The tank was provided with an overflow and cap. I intend to use solvent to fix the cap in place, in order to allow the tank to fill even higher, unless there's a problem in doing so? If it's OK, I've marked around walls etc to set the upper part of the overflow to match the overflow level of the Supadivertas, that being the line of the web address. Further delays with builders, roofing plumber and the project plumber are likely to see a wait of another 3 weeks before any further progress.. Re: Tank - 3rd try 13Apr 25, 2016 10:58 pm That is a very neat low restriction flow path and no vertical riser or overflow pipe to really confuse your visitors...it always does!!! You will have very good quality water in the tank but I do have a very big query...is the very low drain outlet on the RHS intended to supply the pump? If so, it is fitted to draw water from the anaerobic zone...it is fitted very, very low. I consider that not to be best practice. We would normally fit a faucet socket straight to the 40mm PVCu supply pipe but maybe you need the 45 degree elbow for alignment...I can't tell from the photo. It also looks like a 90 degree faucet elbow would have been better than a 45 degree elbow at the tank's inlet valve but again I am not there to see it in real life. You can also use nyglass threaded elbows and these come in different M-F combinations. The one that I have posted below is obviously a F-F. Nyglass threaded fittings are more compact than pressure pipe fittings but they can be exxy. Like ⋅ Add a comment ⋅ Pin to Ideaboard ⋅ You will almost certainly need a check valve between the pump and the tank. I wouldn't use solvent to fit the cap to the overflow outlet, just use a tad of silicone on the cap's outside edge. The cap will be under no pressure. Is there enough room to fit the CFA hose? Regarding the sediment trap at the second tank...the water will be unfiltered and fitting a tee at the inflow pipe's lowest point (base of the vertical riser) will serve as a good trap. The principle is very simple. 3in1 Supadiverta. Rainwater Harvesting Best Practice using syphonic drainage. Cleaner Neater Smarter Cheaper Supa Gutter Pumper. A low cost syphonic eaves gutter overflow solution. Re: Tank - 3rd try 14Apr 26, 2016 1:33 am Quote: but I do have a very big query...is the very low drain outlet on the RHS intended to supply the pump? If so, it is fitted to draw water from the anaerobic zone...it is fitted very, very low. I consider that to be sub standard and it is not good. I neglected to mention that outlet, which was an error by the manufacturer. For CFA purposes, the outlet was ordered at above the 10,000 litre level, at 1,100mm. They will be travelling here to rectify the problem, and instead of the 25mm outlet, will put in a 32mm one to match the same gauge Metric Poly pipe and fittings. Quote: We would normally fit a faucet socket straight to the pipe but maybe you need the 45 degree elbow for alignment.. It took some juggling to arrive at the inlet configuration, and the 45º at both ends so it aligned with both ends. Quote: You will almost certainly need a check valve between the pump and the tank. Quote: just use a tad of silicone on the cap's outside edge. Quote: Is there enough room to fit the CFA hose? Quote: Regarding the sediment trap at the second tank...the water will be unfiltered and fitting a tee at the inflow pipe's lowest point (base of the vertical riser) will serve as a good trap. The principle is very simple. The second tank currently has the Tee system. It has proven effective, though a couple of issues make it awkward in use. The ball valves are quite low, and given that the tanks surroundings are on sloping dirt, and bending is difficult for me, makes it tricky. Supporting the Tee and with 3 metres of unsupported horizontal pipe has meant a lot of weight in both pipes, and several re-adjustments due to lack of a "frame" under them all.That's why I am considering the Wye option on the 2 horizontal pipes, with a custom support system. The valves would be much easier to access this way. I've got 2 PVC Stepped Reducers, which go down to 40mm, if that's sufficient to then add small pipe and ball valve. Re: Tank - 3rd try 15Apr 26, 2016 10:07 am tezzabI neglected to mention that outlet, which was an error by the manufacturer. For CFA purposes, the outlet was ordered at above the 10,000 litre level, at 1,100mm. They will be travelling here to rectify the problem..... I completely overlooked the detention requirement and the necessary minimum height (1.1 metres) of the pump's draw valve. I hope that the manufacturer doesn't supply tanks to their customers with the pump outlet fitted as low as yours, their other customers won't have negligible sediment like you. Your 'sediment' will be more like a fine powder, totally different to what normally goes into a tank and very easy to syphon vacuum if you ever get the urge many years down the track. Tank manufacturers also invariably fit the tank's top meshed inlet immediately above the pump's draw valve. I have never worked out the craziness of this 'logic' either. tezzabIt took some juggling to arrive at the inlet configuration, and the 45º at both ends so it aligned with both ends. Looking at it, I would use a nyglass 90 degree elbow and a straight run of hose but I say that without the benefit of being on site. tezzab By the way I've stretched the budget with a Grundfos CMBE 3-62 pump. It's a good sized quality energy efficient pump, a very good choice for you. tezzab The second tank currently has the Tee system. It has proven effective, though a couple of issues make it awkward in use. I can't quite follow the rest of the explanation in your previous post but yes, pipes do need to be supported. 3in1 Supadiverta. Rainwater Harvesting Best Practice using syphonic drainage. Cleaner Neater Smarter Cheaper Supa Gutter Pumper. A low cost syphonic eaves gutter overflow solution. Re: Tank - 3rd try 16Apr 26, 2016 1:41 pm once again your comments and the time spent are greatly appreciated. I hope the final installation makes it all worthwhile. Quote: Looking at it, I would use a nyglass 90 degree elbow and a straight run of hose but I say that without the benefit of being on site. I'll see if I can get one locally on a trip to town, as it'd be uneconomical as a one off online buy with added freight costs. I had put the 45º elbows in as I'd believed this was part of the design philosophy, and thought I'd seen in mentioned in more than one article as a means of reducing turbulence. A cursory search found one thread where it was discussed, and have a vague memory of it being mentioned when taking off from a system with a full vertical riser. There are only 2 x 90 degree elbows elsewhere on the horizontal flow path. The vertical pipes down from the Supadivertas have 45º elbows, and the Tee on the horizontal path is twisted to "meet and match" that angle, eliminating the need for a 2nd 45º elbow. Quote: Note that the term “low restriction inlet” references the smaller pipe’s flow path. You need to use 45 degree elbows rather than 90 degree elbows to reduce turbulence and Pondflex UV stabilised hose or similar should be used as a reasonable length of flexible coupling. Quote: I hope that the manufacturer doesn't supply tanks to their customers with the pump outlet fitted as low as yours, I did find the manufacturer to have an excellent Customer Order form that allows detailed specifications to be provided. They also require you to re-confirm prior to production. This appears just to have been one that slipped through. - to avoid naming names I've sent the form as an attachment to your commercial email - [quoteI can't quite follow the rest of the explanation in your previous post but yes, pipes do need to be supported.][/quote] there's a pic on the final post of an earlier thread that gives an idea of the layout. I think since then I add one or 2 star pickets near the Tee junction. i now have a fair amount of offcuts of timber and steel to eventually create a solid structure along the horizontal feed, and that location will also enable far easier access to a sediment trap valve(s) on each pipe. http://forum.homeone.com.au/viewtopic.php?f=35&t=72079 Re: Tank - 3rd try 17Apr 26, 2016 2:26 pm tezzab I had put the 45º elbows in as I'd believed this was part of the design philosophy, and thought I'd seen in mentioned in more than one article as a means of reducing turbulence. Yes, it is and you are correct. A 40mm 45 degree elbow will save about 0.7 metres of equivelent pipe length in friction loss as opposed to using a 90 degree 40mm elbow but you have two 45 degree elbows plus additional fittings. To keep it neater and simpler, I would just use a 90 degree faucet elbow and a straight hose for your situation but if you are happy with the current connection, then just use that. What I want people to avoid doing is plumbing two 90 degree elbows, one at the outlet connected to a vertical pipe and another 90 degree elbow at the bottom of the pipe as this generates unnecessary friction loss and turbulence. It is much better to use one elbow at the valve and then connect a flexible hose to the horizontal pipe. If the pipe comes in from the side as yours does, using a threaded elbow is neater. You cannot buy a 45 degree threaded elbow as far as I know. 3in1 Supadiverta. Rainwater Harvesting Best Practice using syphonic drainage. Cleaner Neater Smarter Cheaper Supa Gutter Pumper. A low cost syphonic eaves gutter overflow solution. Re: Tank - 3rd try 18Apr 26, 2016 9:42 pm All good, now have a better understanding and will grab a 90º 50mm elbow, and convert down to 40mm on the vertical drop into the Pondflex. Quote: You cannot buy a 45 degree threaded elbow as far as I know. But you may make your own when you have your 3D Printer setup.  Re: Tank - 3rd try 19Apr 26, 2016 10:23 pm You already have a 50mm x 40mm M M reducing nipple fitted to the inlet, you only need 40mm fittings. You have two best options. Because you can only buy 90 degree PVCu faucet elbows (female thread at one end only), you can use a 40mm faucet adapter to fit into a 40mm faucet elbow to provide a female thread at one end for the director. The easiest and neatest way is to use a nyglass F F elbow like the one I posted as this will connect to the reducing nipple and the director. If you already have a 40mm faucet adapter, then your easiest way is to use the faucet elbow + faucet adapter combination. If you are happy with what you already have, then go with that. I am only referring to aesthetics here. Do you have your own 3D printer? I have all of my prototyping done on 3D and have done for 10 years now. It's all done in nylon. 3in1 Supadiverta. Rainwater Harvesting Best Practice using syphonic drainage. Cleaner Neater Smarter Cheaper Supa Gutter Pumper. A low cost syphonic eaves gutter overflow solution. Re: Tank - 3rd try 20Apr 26, 2016 10:43 pm for simplicity I will get the F F elbow as you've suggested. It may work better once in place. Not sure regarding aesthetics when looking at the multitude of colours involved in all the fittings.   a can of spray paint might improve those aesthetics. I don't have nor ever plan to have a 3D printer. Once all my current projects are done I intend to rationalise, consolidate and minimise my "tech" collection to a manageable level. 18 90494 From what I know about water tanks (I've been working with a client on them for a few years now) is this - The concrete can last a lifetime if they don't crack for some… 2 10636 Thanks for letting us know. The programmer will have a look at this later today. 2 6686 |