Hi all,
My partner (4yo twins) and I have decided to remodel our kitchen. Our house is a solid cream brick 3br home in South Australia built in the 60s. The kitchen is original - well apart from us changing the benchtops when a friend's house was renovated and their bench was cut upside down and gave it to us and 1/2 of it supplied all our new benchtops.
We have had a few people around and are getting quotes. $2-3 grand will remove a wall between the kitchen and dining room giving us one big room that is attached to our lounge room, but can still function as a dining room.
I have been doing the Ikea thing and come up with a few designs though we are going with a cabinet maker. We are doing the rest or contracting ourselves (I used to be a tiler).
My partner showed what we have to others at work and people started coming up with bricking up doors, opening up others, moving windows etc. Some good ideas and we are happy to think outside the square so to speak, but after living here for 5 years we have difficulty thinking differently to what we already have.
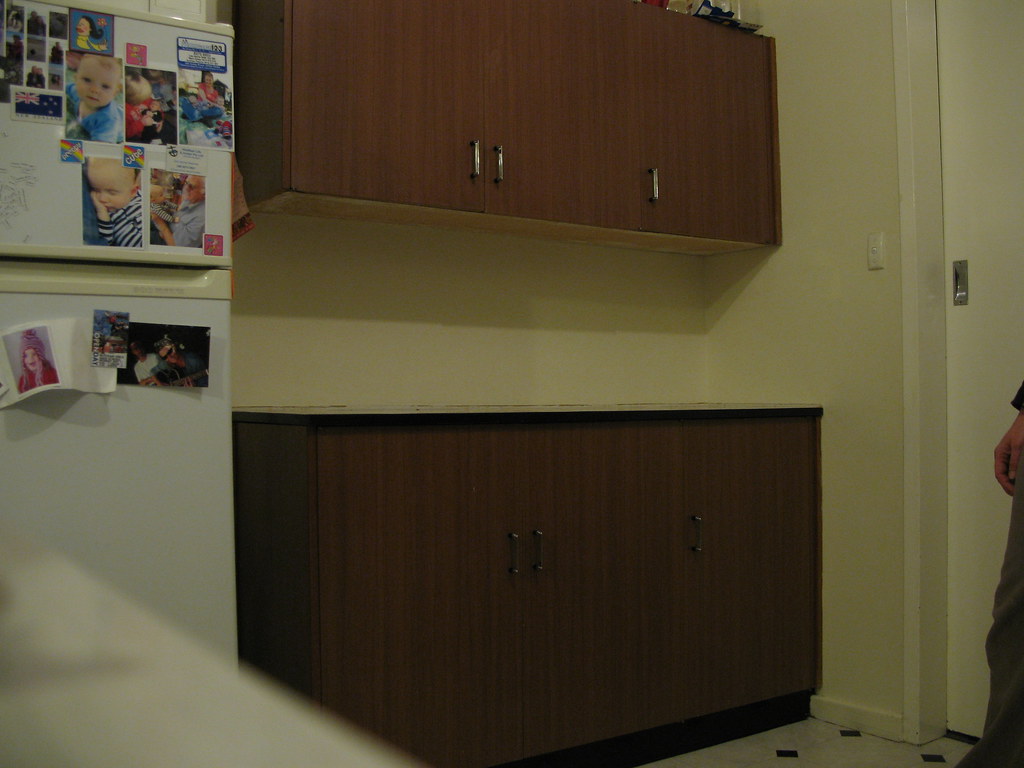
I have provided two pictures - Kitchen small is basically what we currently have but with 600mm cabinets (current cabinets are 420mm), but closes the kitchen in - along with a 900mm benchtop to right of picture. There is a pantry at bottom of picture but I have only been able to show the door to it. it is 1200 by 1000 (approx) and will probably leave as is though we are happy to knock down or open the doorway. Forgive the pictures - it is from the Ikea programme and the only way I could store on computer was to print then scan that picture so the quality is not great. I will try taking photos to show an example of what we have to work with. There are two sliding doors at top of pictures - at right in small kitchen, left and right in large kitchen that go to our deck facing Nth Nth West. They will be replaced along with window, but not necessarily at same time as kitchen is redone (though window will have to be done before if we change that).
I have put in where the sink goes, but that can be moved. We have a dishwasher which we will keep and new oven with gas hob will be going in.
Would you rip down the wall or is it better to have separate dining room (open plan is so popular and functional), though it makes the room long and thin. What would you do if this were your place? If you have any suggestions, they would be valuable to us at the moment.
Thanks.
Small Kitchen: http://www.flickr.com/photos/76897226@N07/7628509558/in/photostream
Large Kitchen: http://www.flickr.com/photos/76897226@N07/7628510160/in/photostream
BTW how do you do the Img thing rather than URL?
WatchingStarredHistory
MembersPros
Browse Forums Kitchen Corner 22 Jul 2012 35 SA Junior Member Re: Help with remodelling our kitchen - Please! 2Jul 23, 2012 9:41 pm OK, here is where we came from - excuse the tiles that had started being removed from the Minister for Finance, but this is what we moved in to. http://www.flickr.com/photos/76897226@N07/7628982686/in/photostream and http://www.flickr.com/photos/76897226@N07/7628981080/in/photostream this, http://www.flickr.com/photos/76897226@N07/7628977554/in/photostream and me laying the wall tiles: http://www.flickr.com/photos/76897226@N07/7629024668/in/photostream Esther sanding the Laminex: http://www.flickr.com/photos/76897226@N07/7629023236/in/photostream Lastly Phoebe and Floyd eating potatoes: http://www.flickr.com/photos/76897226@N07/7629032460/in/photostream Please help us out with ANY ideas - you can see we need them. Thanks, Sean. 14 Jul 2012 18 VIC Junior Member Re: Help with remodelling our kitchen - Please! 3Jul 25, 2012 7:14 pm Hi, we're renovating our kitchen too. Ours is a typical U shaped 80's kitchen. I've redesigned it into a L shaped kitchen with an island bench which leads into our meals/dining area. So it's long and open. So having said that, I prefer the larger kitchen and would rip out the wall. I like how things flow in a long open style kitchen and it will give you more bench, cupboard space, especially with kids. On a personal note, I hate having a breakfast bar, so I would get rid of it and make it a galley style kitchen. 22 Jul 2012 35 SA Junior Member Re: Help with remodelling our kitchen - Please! 4Jul 25, 2012 9:33 pm Wow - a reply! Thanks 80's_abode. I will consider the galley style. Our kitchen is a bit between sizes - too small for a generous breakfast bar, too big to make true galley style work well, but worth thinking about - really opens the space to the other door - and no corners. We tried fitting an island bench, put masking tape on floor to mark out, just a bit too narrow - but could be a really long island. Good luck with your reno's. 22 Jul 2012 35 SA Junior Member Re: Help with remodelling our kitchen - Please! 5Aug 05, 2012 8:51 pm Any more recomendations? It is not easy in this space. We have looked at new homes and established homes in the area. some have given us ideas, but new homes are truly open plan - simply not achievable in 1950-1960s home. Kitchen long and thin, and remove the dining room. I will post some pics of current kithcen and dining room, but if there are any ideas, feel free to post. Re: Help with remodelling our kitchen - Please! 8Aug 05, 2012 9:25 pm Hello again. . .transported some more of your photos here. . . but this is what we moved in to. http://farm9.staticflickr.com/8282/7628 ... 4463_b.jpg and Like ⋅ Add a comment ⋅ Pin to Ideaboard ⋅ this, Like ⋅ Add a comment ⋅ Pin to Ideaboard ⋅ and me laying the wall tiles: Like ⋅ Add a comment ⋅ Pin to Ideaboard ⋅ Esther sanding the Laminex: Like ⋅ Add a comment ⋅ Pin to Ideaboard ⋅ Lastly Phoebe and Floyd eating potatoes: Like ⋅ Add a comment ⋅ Pin to Ideaboard ⋅ Please help us out with ANY ideas - you can see we need them. Re: Help with remodelling our kitchen - Please! 9Aug 05, 2012 9:31 pm Hi Sean. . . just thought I'd transport your photos to the page, as people generally can't be bothered to click on links. Looks like you've already spent a bit of time on the plans. .. nice! You were talking about people telling you to brick up doors and make new doors and stuff. .. are you able to draw up a little plan of the ground floor to tell us what they were talking about? I see that you are planning to change the sliding door (currently to the right of the kitchen) into a window. . . Edit: Sorry. . . forgot to say... wow! Excellent job on the tiles. Are you a tiler by trade? 20 Nov 2010 117 Sydney Eastern Suburbs Senior Member Re: Help with remodelling our kitchen - Please! 10Aug 11, 2012 5:35 pm I love the open plan look and we have done it in our semi detached house. Personally I would knock down the wall. I am confused which is you living and which is dining on the plan? Dining makes sense to be at the right of the kitchen on the plan. You could possibly loose one side of the cabinets currently in the design and put in one large more squarish island. I'm all for islands, I just find people seem to gravitate around them, they are great from serve from for stand up entertaining and for kids they can just pull up their stools and you can serve up right there. Do you use your deck much? 22 Jul 2012 35 SA Junior Member Re: Help with remodelling our kitchen - Please! 11Aug 18, 2012 8:03 pm Wow - thanks Jodge, couldn't work out how to post pics directly to the post so I appreciate you putting them in. I agree if the pics show up, people are more likely to reply with help. Yea, I am a qualified tiler - 10 years in renovation and repairs so I received a great education as renos and repairs are the trickiest to do. When everything is clean and new it is relatively easy - but broken and out of whack? Well things get a bit tougher. I encourage anyone with time to have a go at tiling a nice flat surface - it is not that hard, just get the right materials and tools and get a few tips from websites, forums and tile shops, but if it comes to anything difficult - diamond bond or slopes, probably better to get a tiler (feel free to pm me for advise). Anyway off topic. To Laila, thanks for reply. We have come to the conclusion that we have to knock down the wall. Dining is to left of the plan, kitchen meals is to the right. We would move the kitchen to the meals area but there is not enough room between the end of sliding door and right hand side wall to put any cabinetry. My partner went to JAG kitchens and they suggested galley style with iland running perpidicular, but when we measured up and put masking tape on floor, it was just too narrow still. Only by about 200-300mm (does not sound like much) but was just that bit more space needed to open dishwasher oven etc. Thanks for the suggestion though. And we use the deck a lot! We used it more when we were smoking, but have given up and in Adelaide only use it about 9 months a year now. Fantastic when we have good weather though, kids love it out there, great spot to sit and eat or drink with friends. I don't love timber though requires oiling all the time. I would have put pavers down, but would have required too much backfill. Thanks. Re: Help with remodelling our kitchen - Please! 12Aug 18, 2012 11:24 pm Hi Sean.. . Thanks, excellent to find someone who is actually skilled to glean some info from. Maybe we can do a bit of info-swap. I can draw up your plans (so you can get a better idea of propoportions and space), and you can give me tips on tiling.. .woohoo! Match made in heaven! Funnily enough, I have just bought some grout so I can re-grout our ensuite (i've scrubbed most of the original grout away, so I thought I'd better patch it up). And I love messing around with plans, so if you can pm me, you can email me your plans and I can draw them up and hopefully come up with the best configuration for you. Let's partay! Jo. 22 Jul 2012 35 SA Junior Member Re: Help with remodelling our kitchen - Please! 13Aug 19, 2012 1:51 am OMG Thanks Jo. I'm really grateful. I am more than happy to help you with any knowledge, and I will send through the latest plan. We have a few kitchen companies giving designs and quotes, but none have come up with anything truly original. They have however done a good job of listening to us and offering ideas that will best suit our perceptions of what we would like, but no-one that has caused us to think outside the square. We have considered hiring an architect or interior designer, but the house is 1950-1060's cream brick (affectionately called mafioso mansion down here) but all rooms are upscaled by about 600mm - 1m both ways than the regular for the time of building. It was in need of a lot of repair when we built. I will send you a design, though drafting was not my strong point in trade school. When it comes to re-grouting, the first thing you need to know is good tools. Get a good quality grout rake - you will need it, it is only about 150-200mm long and has a tungsten blade on it. You use this slowly along the joints and make sure you do not scratch your tiles with it. Only try to take out about 50-100mm (lengthwise) grout at a time. Also only work to about 2mm deep - you only need to fill in the top bit of grout (just make sure you remove any soap residue and/or mould before re-grouting). When re-grouting a shower or larger area, it is worthwhile buying a diamond blade for an angle grinder. these days they are between $5-20 each. You want one that is NOT segmented (check any hardware store, you will know what I mean) they often come in packs of 3. Use the one that is smoothest. It will often be just a bit thicker than you actually want it to be, and that sucks (and why you use it gently). Often you will need special attachments (grommets etc) that make it fit to small angle grinder ok. These are often only available to higher end angle grinders - so check that the blade fits well and securely (angle grinders are cheap these days so get the hardware store to sort his out for you - go on Mon-Fri and hassle them to get it right, if they can not, pm me there are work arounds). Use ear, eye protection and dust mask. Gently - I can not stress this enough - Gently grind the blade along the length of the tile. Start with no power to start with to get the feel of the grinder and blade. Once you start the grinder, go very gently, only take a small ammount out - only 1mm or even less until you get the feel of it. When I was doing this for years, I would still start slowly, but if you do it is fairly easy, when you are over confident is when you will stuff up, and if you stuff up you will regret it and pay some-one else to fix it - and cost a lot more than if you got them out there to start with. Work the angle grinder carefully as much as you can (this will be about 60-100mm from all corners) the rest you will have to do with the grout rake - slowly into the corners. Internal corners (ie where two walls meet or floor and wall meet) are relatively easy, just use the grout rake (angle grinder won't fit in there). If silicone (it is rubbery) you can tell with your finger, and will need to remove with a blade (though there are silicone removing compunds available - just ask at hardware store). You are best off removing this as fresh silicone will stick to tile or grout, but grout will not stick to old silicone. Also, grout must be dry for silicone to stick to it. OK, so old grout is removed - you can remove all with the grout rake, but it is a lot of work (shower alcove walls only will take 4 hours solid work - seriously, no break, no smoko or coffee). A whole bathroom is a lot of work. Get a good scrubbing brush, the standard is SABCO "butchers Brush" - you should find this at Bunnings - that is where I found my last one at. When I was apprentice you could only find these at specialist builders suppliers. They are $7-12 each. Give a really good scrub with a lot of water. If in a shower alcove or other area that has had a lot of (as we called it in the trade 'soap scum' or 'body fat') use sugar soap and it will need a really good scrub - worthwhile to do before removing any grout, wash down immideately with warm water. If you use that first then remove grout, wash down well with water and brush after removing grout. Use a sponge to wash down wall after. Wow! this is getting really detailed maybe I should write a DIY booklet about this. Everything must be dry. You may have to leave this 24 hours to be dry. A good way to check is to use a hair dryer 5-10mins, on a small area and if the grout in that area is lighter after 5-10mins, then the rest is still too damp. In hot weather leave another 8-12 hours, or wet weather (in SA in winter leave till tomorrow- Vic or Tas try again tomorrow, but may be long for you, especially in winter). Usually you will have to wait until the next day after washing it down - just leave the exhaust fan on for at least an hour after washing - and leave good ventilation like door or large window open. Buy a proper grout squeegee - it has a yellow base and blue top with wooden handle. don't buy something that looks like a bit of black rubber with a yellow handle you are only looking for trouble. The one I want you to get has a point at one end and is square at the other. Buy good quality grout. Use a brand sold by tile shops. The brand I used to use is now under a different name, but if you buy from a tile shop they are good. Mix as instructed. The final mix should be similar to toothpaste - just a little thicker. Mix in a small bucket - for small jobs I use a honey bucket of 1litre (with all honey cleaned out before). Put in about 2cm water to base of bucket and add grout slowly. You want to mix this from sloppy to drier. You can add a SMALL amount of water to dry mix to thin later, but not too much. If it is too dry you will and add amall amount of water , little by little as it will go sloppy all at once if you give too much water (just add small amount of grout until feels good if this happens). Put some on your squeegee and rub into the joints. You need to make the joints all full. Rub into the joints with the point of the squeegee at 45 degree angle to tiles, then rub off excess with flat of squeegee at 45 degree angle. There will still be grout on tiles, and be uneven in joints. Take sponge (best is approx 10cmx15cmx2-3cmdeep) out of water, squeeze until just NOT dripping. Wipe diagonally across tiles with the aim of smoothing the joints (you will clean the tiles later) - rub all over face of tiles, you can cover many tiles at this time). Keep grout on the sponge - it will make it easier (you will see what I mean). Wash your sponge periodically, and turn the sponge over regularly. Once all joints are regular and smooth, wipe wall down again - wipe once with clean sponge on diagonal (horizontal or perpindicular will wipe grout out of joint), turn over and wipe again - rinse in water and squeese until just not dripping and do again. Don't try too hard at this, as water dries it will leave smears. Wipe once with one side of sponge, otherwise tiles will be smeary at this stage. Once you are happy with the grout joints, leave to harden (1-2 hours in good ventilation). Wipe grout smears off with dry cloth - t-shirt, clean cloth nappy is good for this. If these smears are not cleaning easily it means they are still too wet, leave for another 30 mins and try again. In the unlikely event they still do not come off, Tile shops have a liquid that will remove smears fairly easily. The main trick is to remove enough grout to start with and once the fresh grout is filled in you are not leaving any gaps when sponging off. Now comes to the corners. Remember i am not practicing as a tiler anymore and do not have a builders licence any more. The knowledge I am sharing is due to my experience as a renovation and repair tiler (remember most tilers fix tiles to new walls/floors and do not see the problems of years of use). In your corners - if you live in a brick veneer/ timber/steel frame house, then use silicone for internal joints - that is between wall and wall tile or between wall and floor tile ( this is the Australian standard in all shower alcolves). Cement grout can be used in other internal joints (not shower alcoves that do not get exposed to water regularly). However - and this is not part of Australian standards, if you have double brick house and not timber or steel frame in you bathroom, use grout between these joints. This will sound strange to many of you and If I was tiling I would not do it for legal reasons, but I believe that provided there are no cracks between two walls or a wall and floor in solid (double brick) house, then cement grout is better. If it has not cracked before it is not likely to crack again in near future, it is easier to clean and it is easier to repair, but being your own house it is up to you. Here ends my lecture on re-grouting areal of your tiles. Trust me, it not as hard as it seems. It is difficult, it is time consuming and it is frustrating, but if you have patience and an eye fo detail, I am sure you will sort it out. If you are looking to sell, use silicone in all internal joints, if if solid brick and plan to stay there - as long as there are no structural problems, use grout. If selling, use silicone in internal joints, or get qualified tiler to fix for you. Any problems feel free to pm me and i will do my best to help you. Re: Help with remodelling our kitchen - Please! 14Aug 20, 2012 8:28 pm Hey Sean, hopefully you can get some ideas from here rather than having to pay an architect. Now. . . where are these plans you were talking about  And. . . O. . . M. . . G! Wow! What amazing tips! Bl00dy priceless. Honestly Sean, I really don't have a clue, I'm only planning on re-grouting the bottom of our shower alcove, as I've scraped out most of the grout by giving it a hefty scrub with a brush, so I was going to top it up. But now I've read the above, I'll take the crappy grout mix and black rubber squeegee back to Bunnings for a refund and get myself down to the tile shop instead. I have to print this off!! This is going STRAIGHT to the pool room. We're in a brick veneer house, and none of the joints are done using silicone. . . oops! Though we only have very small joints in between the tiles. I think I'll probably just re-do them if need be. . . they're holding up pretty well so far. Any tips on tiling? Haha. . . JOKING! Come on. . . show us your plan. I was being kind to the builder. With the amount charged for the upgrade the builder is probably charging closer to 100% margin. There are a few variables as I… 5 14430 You never have a fridge against wall as you’ve drawn. The doors can’t open past 90 degrees and it’s difficult and maybe impossible to remove drawers 2 16994 |